Monday, February 28, 2011

Matching Game for Magnet Boards

This matching game has been a hit with my kids.  It's really easy to make, too!

Supplies:
  • Flat magnets or magnet strips
  • Laminating sheets
  • Scissors 
  • Artwork of choice - 2 copies
 First, I found several pictures relating to things we do at church.  I colored them and cut them out.

Next, I cut up magnet strips and attached them to the back.  Yes, I did this before laminating them because my daughter loves to pull magnets off.  This keeps them secure inside.

Arrange your artwork on a 5x7 piece of cardstock (you can either print it already arranged, or cut another set and arrange it.  Would be easier and make your magnets work better to print it directly onto the cardstock)

Place the cardstock onto the magnet board and enjoy a nice matching game!  When my kids are reading, I'll make some word magnets to match up and make it a little trickier.

Clipart obtained from lds.org and lds.about.com

Sunday, February 27, 2011

Puzzles for Magnet Boards

The puzzle pieces are super easy, too!  Just find some artwork and size it to 5x7".

Flip it over and assemble a puzzle on the back.  I just grabbed one of my son's puzzles so that I knew the pieces were sized for kids.  Cover the entire picture (it may not use up your whole puzzle.  That's ok!) 

Take off one puzzle piece and trace around the edges of the open area. 

Continue to remove pieces and trace them....

...until the entire back of the picture is covered (note, I fused some pieces together so they weren't too small)

Cut up magnet strips and put them on the back of eace piece.

Laminate the whole sheet.

Cut the puzzle pieces apart

Flip it over and assemble the puzzle on the magnet board! 

I have a billion ideas for activities with these boards, so be sure to check back for more!

Saturday, February 26, 2011

Magnet Activity Board Tutorial

I attempted this in two different ways.  Use what works best for you.
NOTE: these involve metal sheets with sharp edges.  Use caution when creating and using these boards.

Supplies:
  • Con-Ttact Paper (or laminating sheets)
  • 5x7" galvanized flashing (can be found at home improvement stores in the roofing area.  Be sure it's galvanized)
  • Paper to cover edges
  • Tape or glue dots
  • Artwork (to be used in next tutorials)
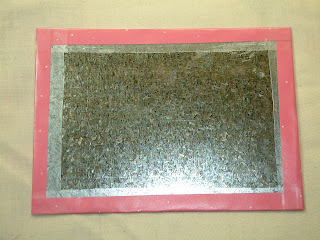
To start, cut strips of paper about 1 inch wide.  Fold them in half over the edges of your flashing.

 
Cover each edge completely.

I found it easier to glue each strip of paper to the metal before the next step.  Just a little glue dot or something will work.

Cut your Con-Ttact paper into strips long enough and wide enough to cover the paper and onto the flashing on both sides (to hold the paper on).  Mine were 1.5" wide by 5" (7" for the longer sides).


Stick the Con-Tact paper over the paper, again so that it goes onto the flashing.  Trim any extra off and, you're done!


I tried to do this by just running the whole flashing sheet with paper attached through my Xyron with the laminating cartridge.  It worked great, except my magnets wouldn't stick as well because of the extra layer.  If you have stronger magnets, you can just laminate the whole sheet to make it easier.  The blue and yellow one (above) was done by laminating the whole thing then cutting the middle out.  The pink one was done with Con-Tact paper just on the edges.
Another side note, you could just buy a magnet board without sharp edges and stay tuned for the upcoming tutorials for the activities that go with the magnet boards!

Thrifty 'N Crafty is not responsible for any injury that may occur from making or using these boards.  Please use caution and supervise use with children, as they do contain sharp edges.

Thursday, February 24, 2011

Magnet Activity Boards

My kids are still a bit young to sit perfectly still and attentatively the whole time we're at church.  So, I try and come up with things that are at least church related for them to do.  These magnet boards are versatile and help keeps kids occupied while not completely distracting from learning something at church.


Puzzles

Matching

Tutorial to follow!

Wednesday, February 23, 2011

Wall Book Shelves

Have you been trying to declutter?  Maybe make more floor space?  I know we are!  Our home is not too big, so anything we can get off the floor helps a ton.  Check out these awesome book shelves!  What a great way to free up some floor space!

Go check out Helping Little Hands!

Wednesday, February 2, 2011

Subway Art - FREE DOWNLOAD

Subway art is so popular right now.  Here's my first attempt at designing my own.

Enjoy a free download for your personal use!
Click here to get your own Black & White

Click here to get your own Pink and Red

(Note: these are formatted to be 8"x10" so you can print them at home!)

Saturday, January 29, 2011

Wreath

This simple wreath is interchangeable to save money when you are ready to decorate for a new holiday!

Supplies:
Foam Wreath Form
Ribbon of choice - amount will vary depending on size of wreath
Straight Pins
Candle or lighter or other heat source

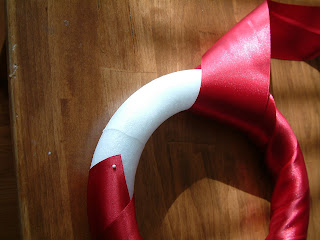
Begin by pinning your ribbon to your wreath form and wrapping it around the wreath.

When form is covered, pin the end of the ribbon to finish (note: I burned the ends of the ribbon to prevent fraying.) 

To make the flower:
Cut various sizes of circles from the same ribbon (or any other satin material you choose).  Heat the edges with a candle or lighter, enough to make the fabric curve, and slightly burn the edge if you want.  Layer the circles and glue or sew them together.  Fill the center of a flower with a ribbon knot, pearl, or anything you choose.   

Pin the flower to the wreath (Note: you can make this permanent by gluing it instead of pinning).


Tie a ribbon to hang it from.  I tied an extra knot in my ribbon so it would hang straight.

Now you have a beautiful wreath that you could easily take apart and re-assemble for any season!  You won't have to worry about buying more forms, or storing them.

Thursday, January 27, 2011

Love Blocks

This is one of my Valentines Day decorations that I just love.  And, it's super simple to make!

Supplies:
1 1/2 inch square blocks (I purchased these at Hobby Lobby, but you can easily cut your own if you have the tools)
Paint - colors of your choice
Letters - mine were puchased at Hobby Lobby in the scrapbook section.  They are made by Spare Parts.  You could use stickers, vinyl, or anything that suits you for letters.
Tape - preferrably painters tape
Mod Podge
Adhesive (if your letters are not already sticky)- I used glue dots

  1. Paint blocks with your base color of choice.  Allow to dry completely
  2. Tape off a square and paint the inside of the square (note, I have other blocks that I painted a 1 inch square piece of paper and glued it on.  That worked just as well.  That's a springtime tutorial!)
  3. Allow to dry. 
  4. Mod Podge to seal the paint (you could use any spray sealant, if you choose)
  5. Adhere letters to blocks
Here's my favorite thing about these blocks:

They fit perfectly with this birthday calendar I made with my women-in-laws!  I have a few other block sets that I change out seasonally.

Tuesday, January 25, 2011

Valentines Craft

I don't have step-by-step instructions for this, but it's pretty simple.

Supplies:
Fishing Line (or ribbon would work, too), cut to various lengths
Various Valentine-themed paper, scraps work great!
Scissors
Glue Stick or tape

  1. Cut hearts and circles out of random paper scraps.  I used a Cricut to cut mine, but you can do it freehand, too.
  2. Glue or tape shapes to fishing line/ribbon (I did mine double sided, but it would probably be easier to just tape it with one shape).
  3. Hang each strand from the ceiling and enjoy!